Friday, May 22, 2009

More Crosman 180 -- A New Bulk Fill Cap

I'm still playing with the Crosman 180 from a couple weeks ago. Just needed a quick and dirty replacement cap for the B&A bulk-fill adapter. The B&A adapter comes with a nice thread protector, it's just being used on another gun.

In order to save some time, I decided to just start with this--a 1/8" NPT brass plug. Check the plumbing aisle of Lowe's, Home Depot or similar.

Not thing wrong with just using it as is. But why would I do that?

Just going to make it a bit slimmer. Chucked it in the 3-jaw and faced down the square wrench flats. Removed about 3/4 of the depth.

Then spotted the center,

found a skinny drill bit,

and through drilled a tiny hole with a tiny bit. Size? Uh, small. Doesn't matter. It's just a hole to vent Co2 in the odd chance that the seal fails in the bulk-fill adapter.

Flipped in the chuck and faced off most of the threads. Only need about 4 threads for the cap to fit properly.

Installed. Took just a few minutes of lathe time.

Thursday, May 21, 2009

Messing With a Crosman Model 70, Part 3

Just a bit more butchery.

As you can see the rear sight was broken.

The parts removed. The actual sight blade was missing.

I used a razor saw to cut off the remaining body.

It's interesting a hole is there.

Used files to get it mostly smooth.

Mounted a Williams sight. I'll probably keep the scope on it but the Williams sight looks semi-original.

The end of the barrel shroud was chewed up so I chucked the whole thing in the lathe.

There was plenty of material so I removed a bunch of the damage.

That circular remnant was removed with a countersink.

The barrel got a shot of Krylon plastic paint.

Looks much better.

I used some steel wool on the stock and gave it a coat of Tru-Oil. Nothing fancy.

I think it's interesting that there's a cutout you can see the bolt lug through.

All done. It's a fun plinker but the plastic shroud around the straw barrel is too flexible for my taste. If I ever want a project I'll replace the shroud with a drilled out rifle barrel, but I doubt that day will ever come.

Wednesday, May 20, 2009

Messing With a Crosman Model 70, Part 2

On I go.

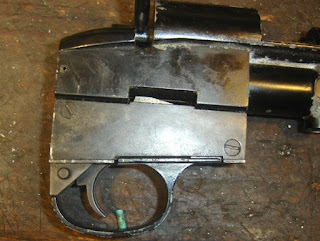
Those two screws hold the plate covering the trigger group.
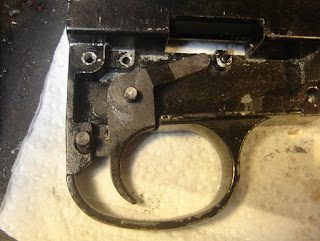
The trigger group.

Not much to keep track of.

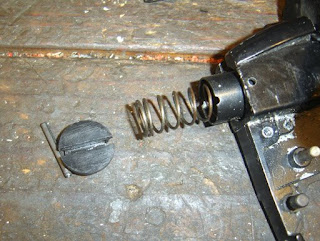
A roll pin holds a plastic plug that retains the hammer assembly.

Most of the hammer parts...

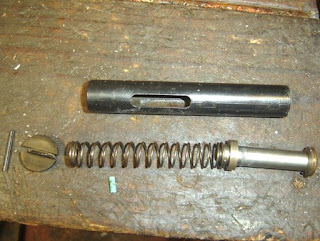
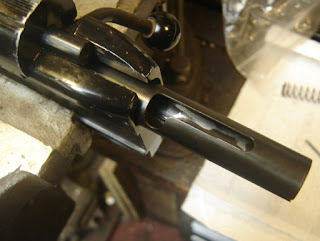
The bolt just slips out once the hammer and sleeve are removed.

Wait, there's more! Another spring keeps the hammer off of the valve stem and regulates the striking force.

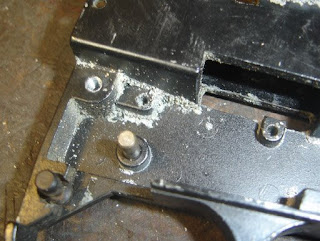
There was a bit of corrosion on the pot metal receiver.

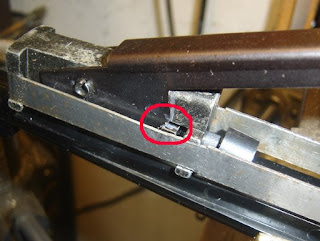
Just a pic to remind the right way for the safety to be installed...

Once cleaned, I started to put it back together. It's important to align the hammer sleeve.

The trigger assembly goes back together in reverse. I lubed all the trigger components.

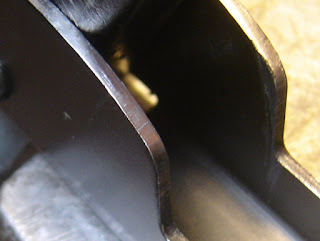
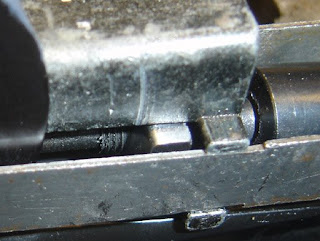
You can see the old piercing pin on the right was a bit mashed up.

The cam was binding on the tapered nut. I think this is because of the redesign of the piercing pin and seal for the 38 - the new seal is thicker?

You can see a line across the cam surface where it catches on sharp edge of the nut.

So I made a slight radius on the nut edge.

The screw hole holding the barrel down in front was stripped, so I drilled it out and tapped it 8-32.

After assembly I found the barrel was a bit low (as evidenced by being out of the adjustment range on the scope crosshairs), so I added a washer between the stock and the barrel boss shown above.

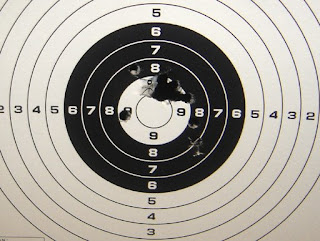
Once a few sighting shots (the non-grouped holes) were taken, you can see I got an ok group.

I found the trigger pull was insanely heavy. So I polished all the surfaces.

And swapped a lighter spring for the old one.

Doesn't look too bad!

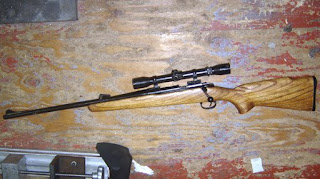
I scoped it because the rear sight is broken, which will be covered next installment.

Tuesday, May 19, 2009

Messing With a Crosman Model 70, Part 1

I placed a "WTB Beaters" ad on the yellow forum last month and was able to buy several abused airguns on my want list. One of these was a Crosman Model 70 Rifle.

As received there was clearly a problem with the CO2 cartridge loading port.

The steel strap was bent.

I unscrewed the strap.

Pretty severe.

Tweaked.

So I hammered and bent.

This method worked the best.

But I then had to shrink and stretch the metal through selective hammering to get it flat again...

Not bad.

Still a little bent though. More hammering and tweaking...

Finally about as good as it'll get.

You can see the cam mechanism, that bears on the tapered nut for piercing the cartridge.

That screw adjusts the tension.

One setscrew removes the barrel and shroud.

The shroud is solid(?) and I'm assuming molded in place around the barrel.

The piercing pin and seal is the same as used on the Crosman 38 revolvers.

Unscrewing the valve.

The inlet and exhaust valve parts removed.