Completely struck out with that vintage Morgan pad. The base had been fitted to something pretty svelte. So, that's just one more reason to keep buying more airguns. Given enough new airgun purchases, the old pad will eventually fit one of them.
Since I was still in Morgan mode, I decided to fit the new model Premium Morgan I got from Nick a while back. Making the gun selection wasn't so easy. At least four or five different rifles were candidates. Eventually, I decided to fit it to a .22 cal
Beeman R1. I consoled myself that I'll just eventually buy more pads.

Started by removing the old pad and white line spacer. Bolted down the new base using the existing stock holes. The base appeared to be well centered so I didn't need to drill new holes.

Above and here you can see the overhang. The aluminum needs to be ground away to fit.

I'll try to carry the contour of the buttstock through the lines of the base.

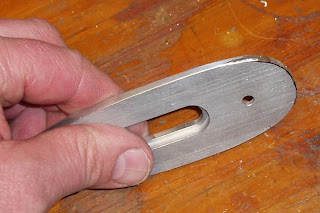
Traced the stock profile onto the base. Remember this is the gun side, so any angles cut need to flare outward slightly--especially at the heel where the angle is more severe.

I blackened the area with a magic marker. I know that using the pencil to trace will leave the plate a few hundredths or more larger all around. So, I guess I'm starting slow.

Started at it with a file. Rubbed the file with chalk first to help prevent the aluminum from clogging the teeth. Was only marginally successful. Used the file card to clean quite a bit then gave up and went to the bench grinder. Grinding aluminum on a bench grinder is probably best avoided. The wheel loads up with aluminum very quickly which minimizes the cutting action. Then there's the danger that the aluminum will heat and expand in the pores of the wheel and cause the wheel to shatter in use. I'd like to avoid that. Dressing the wheel frequently helps prevent excessive loading. A belt sander or a sanding drum with a coarse grit (something like 60) would have been a good alternative.

After the initial shaping. Guess I could have been more aggressive on the removal.


Coated the base in dykem layout fluid this time...

and reinstalled. Found a sharp scratch awl and scribed a very fine line around the perimeter.

As always, click any pic for an enlargement. The scratched line is pretty evident.

Went to the drill press next with that 60 grit sanding drum. Kept the base angled slightly to create the taper to match the buttstock. I did most of this by test fitting and by eye. There are
tools from Brownells to make this easier and take some of the guesswork out.

Looked really close, so I block sanded it to 220 grit.

Then used a 3M fine finishing pad to remove the scratch lines leaving a nice matte finish. This single step took about 3 minutes.
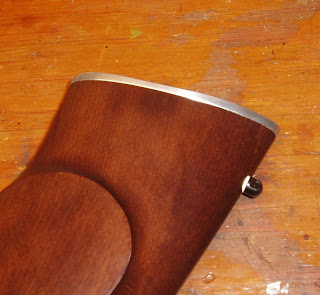
It'd be fine to call it quits here and get on with your day. The pad is fitted alomst seamlessly over about 80% of the perimeter.

Still, I want it right.

The black line is the only area that still stands proud.
Back to the sanding drum to work that area down slightly. Then the 220 grit sanding block and again with the 3M pad.

When I was satisfied that it looked right, I hand buffed the sides with Mothers Mag and Aluminum Polish.

Final installation--don't forget the all important adjusting bolt. The lines/angles look good on the stock-to-base transition. I like the angle at the toe.

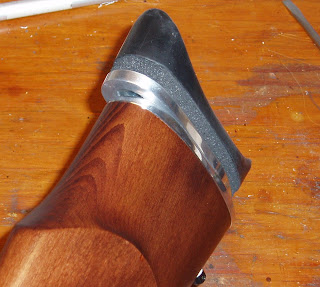
Pad installed high.
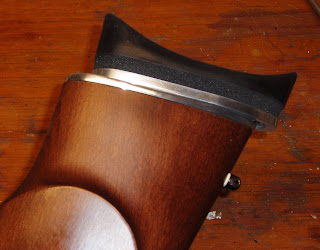
And at the lower end of the travel.

One down, several more to go.


